Updated on Dec. 3rd 2017.
Having recently started to use GitLab and their automated pipelines (GitLab CI) for hosting this website on GitLab Pages, I wanted to also learn how I can use their service to upload artifacts to S3.
There are tutorials out there that do a good job in explaining how to do it and in more detail (e.g this or this), but I think that my solution has some valuable ideas points too.
My tutorial only works with pages that don’t need further rendering (files are all there, no Hugo or Jekyll required for pre-processing). Otherwise all elegance is gone.
Create an AWS user with minimal permissions
First, create a user dedicated just for the role to uplaod things into the S3 bucket. The user should not be allowed to do anything else, so even if somehow the access keys are breached, not much harm can be done (here is a short deterrence story).
Therefore, I created a user in AWS IAM that can only access one bucket and has this minimal permission policy:
{
    "Version": "2012-10-17",
    "Statement": [
        {
            "Sid": "",
            "Effect": "Allow",
            "Action": [
                "s3:PutObject",
                "s3:DeleteObject",
                "s3:ListBucket"
            ],
            "Resource": [
                "arn:aws:s3:::test-bucket",
                "arn:aws:s3:::test-bucket/*"
            ]
        }
    ]
}
You might wonder why the DeleteObject permission is needed. This is, because unlike the other tutorials, which use the cli copy-command (aws s3 cp), I will be using the sync command (aws s3 sync).
This should make sure that when I delete some file from my GitLab repository, it doesn’t remain in the bucket. Automatic garbage cleaning.
Store environment variables in GitLab
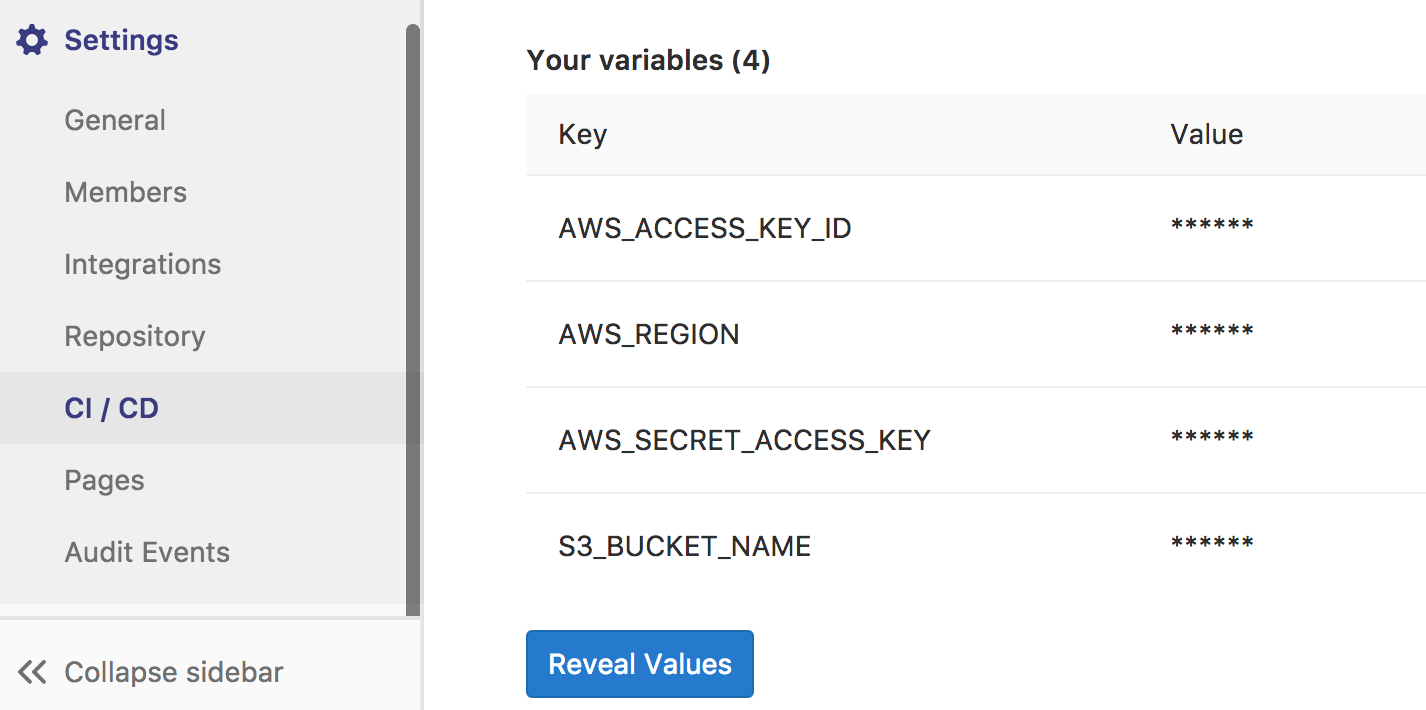
For the just created user, get the AWS access id (AWS_ACCESS_KEY_ID) and key (AWS_SECRET_ACCESS_KEY) and store it in the CICD settings for your GitLab project. Also, add the region of the bucket since for some regions you need to specify the region (AWS_REGION) explicitly in order to be able to use the command line client.
Update: You might want also to save the S3 bucket name as an environment variable.
When someone forks your project, they don’t need to edit the .gitlab-ci.yml file.
The name I chose is S3_BUCKET_NAME.
My settings look like this (now):
Add a GitLab CI configuration to your repository
Last, add a .gitlab-ci.yml to root of your git repo. This creates the actual pipeline.
# I saved the variables that are needed in the CICD settings of the gitlab probject.
# You can also add them here directly as shown in the next line.
# variables:
#   S3_BUCKET_NAME: test-bucket
#   AWS_ACCESS_KEY_ID: secret
#   AWS_SECRET_ACCESS_KEY: secret
#   AWS_REGION: secret

deploy:
  image: quay.io/coreos/awscli
  script:
  - aws s3 sync . s3://$S3_BUCKET_NAME --delete --exclude ".git/*"  --exclude ".gitlab-ci.yml" --exclude "README.md"
  only:
  - master
Let’s go through it: First, the bucket is saved as an environment variable. Then, we create a deploy stage. It uses the awscli Docker image from CoreOS, which is hosted on their repository quay.io. In comparison to the other tutorials, this saves us the installation of the aws client with pip (however, using this image makes hugo or other website builders not accessible).
Then, the aws s3 sync command makes sure that the files from the current directory are uploaded.
The --delete flag ensures that files that are on S3 but not in the repo get deleted.
Also, I did not want to upload the .git folder, the .gitlab-ci.yml and the readme file, so I excluded them.
Update: Bucket Policy
I was made aware that sometimes the files in the S3 bucket ceased to be publically available after running the pipeline. So let’s take a look what must be set that you can reach your website in the bucket from the public (I am not talking about Cloudfront now, just the plain S3 website hosting).
First, you need to add a bucket policy. Go to the S3 console and then onto the Permissions tab.
There, you can add this (with your bucket name) to the Bucket Policy Tab:
{
  "Version":"2012-10-17",
  "Statement":[{
  "Sid":"PublicReadGetObject",
        "Effect":"Allow",
    "Principal": "*",
      "Action":["s3:GetObject"],
      "Resource":["arn:aws:s3:::example-bucket/*"
      ]
    }
  ]
}
Second, turn on static website hosting in the Properties tab. You should see an url like http://test-bucket.s3-website-eu-west-1.amazonaws.com displayed as your endpoint which you can call in your browser. HTTPS does unfortunately not work with S3 out of the box and you will need to use CloudFront. Then, you might want to modify the policies further.
Checking the result
If everything is right, after the next commit, your log for the pipeline should look something like that:
Running with gitlab-runner 10.2.0-rc.1 (927894e6)
  on docker-auto-scale (e11ae361)
Using Docker executor with image quay.io/coreos/awscli ...
Using docker image sha256:31e6b76cba67378be9f161b6e92d8480f2b0cfa8126b7004936fd3b3af5db0c2 for predefined container...
Pulling docker image quay.io/coreos/awscli ...
Using docker image quay.io/coreos/awscli ID=sha256:e6253c7671445a846673de8cab3ffe94e8c0a249826259d6753b2aba707ae71a for build container...
Running on runner-e11ae361-project-4676094-concurrent-0 via runner-e11ae361-srm-1510935317-720ff584...
Cloning repository...
Cloning into '/builds/yourname/S3-Deployment-Test'...
Checking out 5f834ec2 as master...
Skipping Git submodules setup
$ aws s3 sync . s3://$S3_BUCKET_NAME --delete --exclude ".git/*"  --exclude ".gitlab-ci.yml" --exclude ".README.md"
Completed 256.0 KiB/4.1 MiB with 5 file(s) remaining
Completed 263.5 KiB/4.1 MiB with 5 file(s) remaining
upload: ./index.html to s3://test-bucket/index.html
Completed 263.5 KiB/4.1 MiB with 4 file(s) remaining
Completed 363.0 KiB/4.1 MiB with 4 file(s) remaining
Completed 619.0 KiB/4.1 MiB with 4 file(s) remaining
Completed 875.0 KiB/4.1 MiB with 4 file(s) remaining
upload: images/c_gift.jpeg to s3://test-bucket/images/c_gift.jpeg
Completed 875.0 KiB/4.1 MiB with 3 file(s) remaining
Completed 1.1 MiB/4.1 MiB with 3 file(s) remaining
Completed 1.4 MiB/4.1 MiB with 3 file(s) remaining
Completed 1.6 MiB/4.1 MiB with 3 file(s) remaining
Completed 1.9 MiB/4.1 MiB with 3 file(s) remaining
Completed 2.0 MiB/4.1 MiB with 3 file(s) remaining
upload: images/c_flowers.jpeg to s3://test-bucket/images/c_flowers.jpeg
Completed 2.0 MiB/4.1 MiB with 2 file(s) remaining
Completed 2.3 MiB/4.1 MiB with 2 file(s) remaining
Completed 2.5 MiB/4.1 MiB with 2 file(s) remaining
Completed 2.6 MiB/4.1 MiB with 2 file(s) remaining
upload: images/c_wine.jpeg to s3://test-bucket/images/c_wine.jpeg
Completed 2.6 MiB/4.1 MiB with 1 file(s) remaining
Completed 2.9 MiB/4.1 MiB with 1 file(s) remaining
Completed 3.1 MiB/4.1 MiB with 1 file(s) remaining
Completed 3.4 MiB/4.1 MiB with 1 file(s) remaining
Completed 3.6 MiB/4.1 MiB with 1 file(s) remaining
Completed 3.9 MiB/4.1 MiB with 1 file(s) remaining
Completed 4.1 MiB/4.1 MiB with 1 file(s) remaining
upload: images/header-background.jpeg to s3://test-bucket/images/header-background.jpeg
Job succeeded
Hope it worked for you too. Good luck.